Friday, August 31, 2012

Mermaid Nails: Gradient Plus Stamping With Mash Plate 39

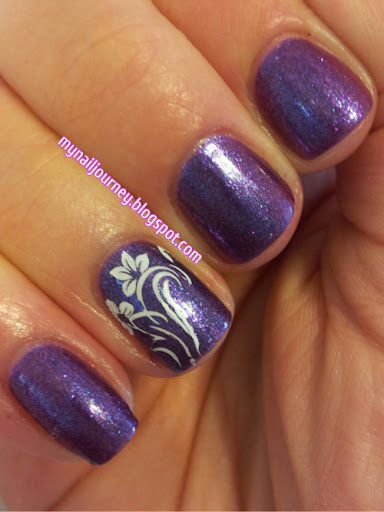
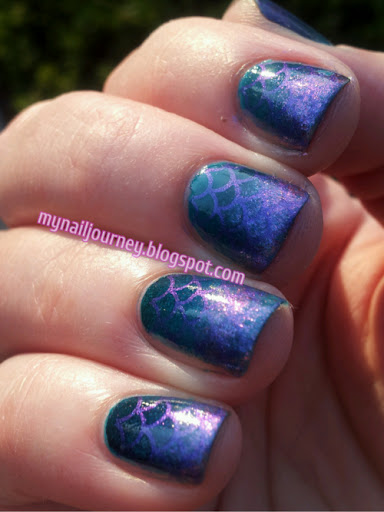
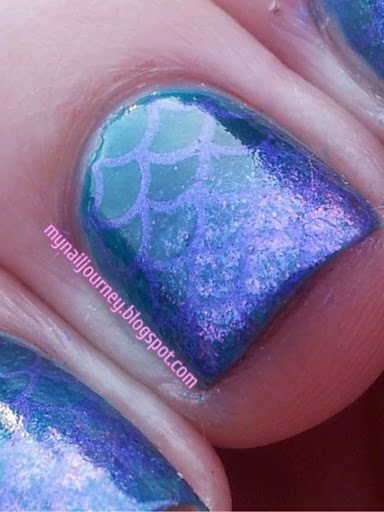
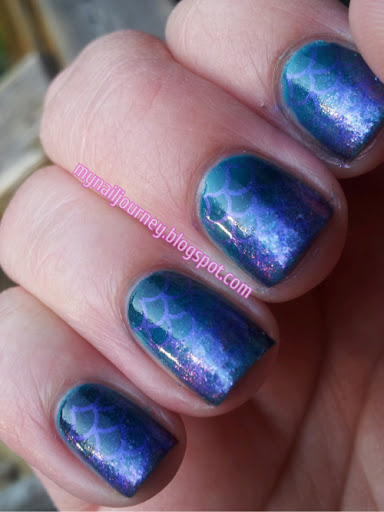
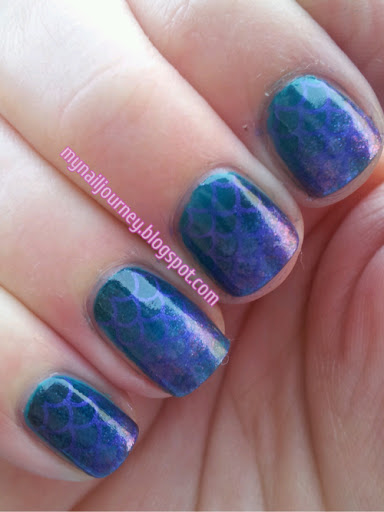
     In the Facebook group, Crumpet's Nail Tarts, our Summer Challenge for today was to do a mermaid mani.  I wasn't quite sure what I was going to do since there was no way in hell I would be able to draw an actual mermaid on my nails.  I googled mermaid nails and quickly figured out that I needed to do a gradient with a scale like stamp to mimic a mermaid's tail.  I am so pleased with how this came out.  I wish I could have captured all of it's beauty in the photos, but there was not very good sunlight out.  :-(  It turned out exactly how I wanted it.  Beautiful, sparkly, and just a hint of  scales.

Base coat: Sally Hansen Diamond Strength Hardener
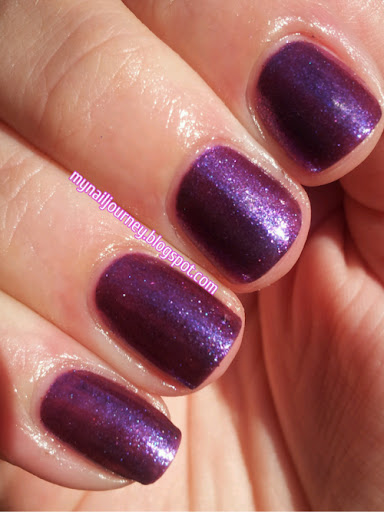
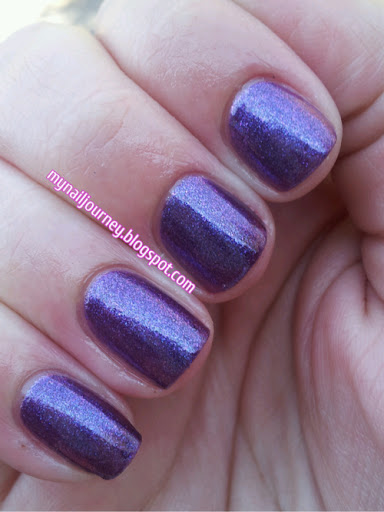
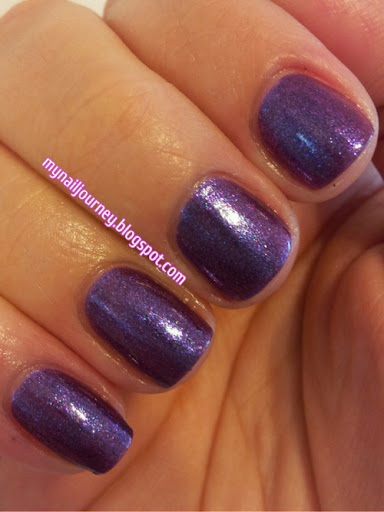
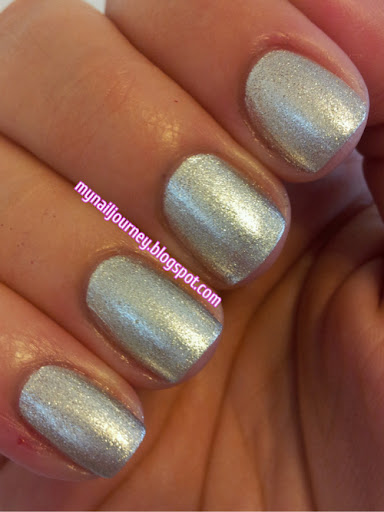
Base color: Fly from OPI - 2 coats
Gradient colors: Fly-closest to my cuticle
                           Khloe Had A Little Lam-Lam from Nicole by OPI - in the center
                           Grape...Set...Match from OPI- at the tip of the nail
Stamping color: Let's Talk from Sinful Colors
Stamping plate: Mash 39
Top coat: Sally Hansen Insta-Dri Anti-Chip Top Coat


I hope that you like these as much as I do!


Tuesday, August 28, 2012

Flip Flop Mani

     Today's challenge mani topic was flip flops.  I was a little sad when I read this because I don't have the cute stamp that everyone has with the flip flops on it and I wasn't very inspired because I only have flip flops with a straight color, not a cute design on them.  I was just going to do a skittle mani with all of the colors of flip flops I own, but then I remembered how I wanted to paint the designs from my pedi bag onto my nails.  It was the perfect idea!

See, flip flops!  The bag is very sheer so here is a picture of one of the bottles of products that comes in this uber cute bag.


Base coat: Sally Hansen Diamond Strength Hardener
Base color: Glazed Pearl from SXY by Unforgettable Moments - 2 coats
Pink: Pink Friday from OPI
Green: I Need a Refresh-Mint from Wet N' Wild
White:
     Straps on flip flops: White from Kiss Brush On Nail Art Paint
     Flowers on flip flops and dots: French White Tip from NYC
     Stamped flowers: Stamp Me! White from Essence
Stamping plate: Mash plate 35

As I am sure you will be able to tell, the green and pink flowers were done by hand.  I used a dotting tool to do these and the random dots that are all over.  The white flower on my middle finger was the only one that was stamped on to my nail.

Taken inside without flash


So, what do you think of my recreation?


Monday, August 27, 2012

Tic-Tac-Toe Nail Art

     In the Facebook group Crumpet's Nail Tarts, formally know as the Purple Crumpet Fairy, on Mondays we do Monkey See, Monkey Do manicures.  All this means is that we recreate our favorite mani's that we have seen on other blog's and show our interpretation of them on ours.  I like doing this because it showcases other's blogs and gets the word out about them.  Hopefully bringing in new readers to their blogs.
     I found this image on Pinterest and from what I can see Steff did this manicure.  I don't quite understand Reddit's layout or what it even is but, the Pinterest link took me to her page.  You can see her mani here.  I immediately knew I needed to do this mani.  Now, I got VERY sidetracked while doing this mani.  I wanted it to be perfect so I ended up redoing the pinky, which still smeared, and the thumb.  I spent WAY to much time on it, but I think it paid off.  It is so stinking cute.  I applied the hearts with different sized dotting tools and used a stiping brush for the Tic-Tac-Toe board and the x's on my thumb.

Base coat: Sally Hansen Diamond Strength Hardener
White: French White Tip from N.Y.C. - 3 coats
Black: Black Creme from Wet N' Wild - 2 coats
Pink: Strawberry from Avon
Black for the tic tac toe board: Black from Kiss Brush On Nail Art Paint


Both of these pictures were taken inside with out flash, in the same room.  Can anyone explain to me why my skin tone is so different in each of these pictures?


Sorry for my crusty cuticle on my thumb.  I try to hide my thumbs as much as possible but I had to show it for this post.  I really hope that you guys like this.  

If you would like to see some more MSMD manis please feel free to check out these other blogs!


Debbie at The Crumpet - http://thecrumpet.blogspot.co.uk
Missy @ Gnarly Gnails - http://gnarlygnails.blogspot.com
Nayade at Toxic Vanity - http://www.toxicvanity.com
Alyssa at Fancy Phalanges - http://fancyphalanges.blogspot.com/
Misha @ Enigmatic Rambles: www.enigmatic-rambles.blogspot.com
Carrie @ LeSamowen:Life, Love, and Nail Polish: http://lesamowen.blogspot.com/
Basia (or Bazzia) @ polish my mind: http://polishmymind.blogspot.com/
Isabel - Little Fairy: http://isaspinods.blogspot.com/
Stella - My Wet Nails: http://mywetnails.blogspot.com
Michelle-Lacquer Or Leave Her!: http://lacquerorleaveher.blogspot.com
Angi @ Angelina´s Nails & More www.angelinaswelt.blogspot.de/
Kia @ Lacquered Libra  http://lacqueredlibra.blogspot.com/


Sunday, August 26, 2012

Zoya Lolly and Stamping With Sinful Colors Let's Talk and Mash Plate 38

     Today's challenge in the Facebook group Adventures In Stamping was pulsating pink and purple.  I figured it would be a really good time to try out my camo stamp that i have been dying to try since I got it.  I love camo.  My sister makes fun of me and tells me she doesn't understand who snuck in to my bedroom in the middle of the night and raised me because I love everything country/western, penguins, and nails.  Odd mix of things lol.
     I was irritated how this ended up looking more like zebra print though.  I think next time I will try mixing the stamping with white and purple so that it creates more of a girly camo look.
     I decided to us Zoya Lolly for the base color, a bright pink with a matte finish.  The formula on this was funky!  I ended up doing three coats to even it out.  I then applied my Essence Nail Art Special Effect! Topper, waited for it to dry and then did the stamping.

Base coat: Sally Hansen Diamond Strength Hardener
Base color: Lolly from Zoya - 3 coats
Top coat: Essence Nail Art Special Effect! Topper
Stamping color: Let's Talk from Sinful Colors
Stamping plate: Mash 38


All these pictures were taken inside without the flash


Thursday, August 23, 2012

Funky French With OPI's Pink Friday and Excuse Moi!

     If you can't tell, I have been really in to tape manis lately.  I have a type A personality and there is just something about a straight, clean edge that screams beautiful to me.  Trust me when I say that I wish I had a type B personality.  Art class was so hard in high school because everything had to be perfect and art is not about perfection. I loved clay but everything I did, as previously stated, had to be perfect.  My best friend was a complete B personality and she could throw the most AMAZING pieces of artwork together in an hour and be showcasing her items in artshows.  Where as my carefully planned out day and night projects got A's but never a ooooh or and aaahhhh and never the spotlight.  Maybe this is why I love blogging and doing my nails.  Because my blog is all about my artwork and it attracts people who are drawn to my style.
     Well, all that to say, I have another tape mani for you.  This is my first funky french on here, and I quite liked it.  As much as I love a crisp, clean line, I think next time I will invest in some binder paper rings.  You can see what I am refering to in this tutorial.  I would like my french manicure lines to be a little rounder than they are in these pictures.


Base coat: Sally Hansen Hard As Nails Hardener
Base color: Pink Friday by OPI
Tip color: Excuse Moi! by OPI
Top coat: Sally Hansen Insta-Dri Anti-Chip Top Coat


Taken outside in direct sunlight


Taken in indirect light


Taken inside without flash


Are you a type A personality, or type B?  Can you handle crazy fun nails, or do you like crisp, clean lines? lol.


Tuesday, August 21, 2012

Tape Mani and Doticure With Matte and Glossy Finish

     Hey guys.  I'm back from another 80 hour work week and my cuticles are proof of that.  They look like total crap!  Ugh.  It is so frustrating.  I will definitely be giving them some TLC this week.  The inspiration for today's manicure came from this post on Chloe's Nails.  I pinned it on Pinterest a few months ago and needed some inspiration yesterday.  Once I saw this I thought, hey, I can do that!  If you haven't visited Chloe's Nails I highly suggest you do because she is one of the biggest nail bloggers out there, (that I know of) with over 9000 friends.  She has not been blogging for a few months due to spending the summer with her kids but I have my fingers crossed that she will return soon.  I love all of her manicures.
     I was so in love with this mani until... I applied my top coat.  I should have listened to my gut and opened my new one but I thought, no, I don't want to waste my money, I will just use what is left in this bottle.  BAD IDEA!  IT RUINED MY MANI!  It came out completely gloopy, took hours to dry because it was so thick, and because of its thickness, it bubbled when it dried.  I wanted to cry!  I even had to redo one of the nails because it was so thick it just scraped right off.  :-(
     To achive this look I applied two coats of Wet Cement from Wet N' Wild.  I then applied my Essence Nail Art Special Effect! Topper to give it the matte look.  After completely drying I used tape to apply Lincoln Park At Midnight by OPI and then with a dotting tool applied Wet Cement of top of that.  I only applied my top coat to the glossy side of the mani since I wanted the matte side to stay mattefied.  If you need more specific directions on how to do a tape mani, you can view my blog post on it here.


I feel ok about this picture if you only look at my pinky and ring finger.  lol
This was taken inside without the flash


Again, ok if you look at the pinky and ring finger.


I am including this picture because it more acuratly shows the colors.  The colors
are more washed out in the above photos for some reason.  This was after a full day of wear
so I apologize for the tip wear and the huge chip missing from the pointer finger.


Have you ever done the perfect mani and then ruined it by applying your top coat?


Wednesday, August 15, 2012

Blogger rant!

If you guys ever read my comments I'm sure you've seen me say more than once that I have accidentally deleted a comment. You may be thinking what the hell is wrong with this girl and why is she lying so when I did it again yesterday I decided to take a screen shot of the email they send you so you can see why my fat fingers keep hitting delete! Please change the email setup Blogger! Sorry Gnarly Gnails. But thank you for the lovely comment. :-D


Tuesday, August 14, 2012

Tape Mani With OPI Grape...Set...Match and Sally Hansen Celeb City

     As I was cleaning up my work station from the previous few days mani's, I piled all the polishes together and when I saw Grape...Set...Match next to Celeb City I knew that I had do something with these two colors.  I had seen this mani pop up in my Facebook News Feed a few days prior and knew this would be the perfect mani to attempt with these colors.
     I must say that I am pretty impressed with this tape mani.  I have tried others before and been impatient, but my patience paid off and I wore this proudly for three days.   If you do not know how to do a tape mani you can visit my blog post here.

Base coat: Sally Hansen Insta-Dri Anti-Chip Top Coat
Base color: Celeb City by Sally Hansen Xtreme Wear - 2 coats.  Swatches are available here.
Top color: Grape...Set...Match by OPI - 1 coat.  Swatches are available here.

All of these pictures were taken indoors with out the camera flash.


What do you think of my interpretation of this mani?  Yay or nay?


Monday, August 13, 2012

OPI Grape...Set...Match Swatches and Stamping With Mash Plate 46

     I picked up OPI's Grape...Set...Match for free!  I am sure that you are asking yourself how by now.  Well, let me tell you.  Because I am such a nail freak enthusiast I follow many other nail enthusiast on Facebook.  When something cool pops up in the polish world every single one of them like to talk about it.  Turns out the website copius.com is kinda like an E-Bay thing.  People are allowed to list, sell, and buy stuff on there and when a new person signs up from someone else's link they get a $10 credit to use.  I actually paid $.59 for this polish because the asking price was $9.99 and of course they threw som $.60 fee in there.  But whatever, $.59 for a new OPI, great, SOLD.  I don't have a link for you guys to follow but if you follow a lot of nail bloggers on Facebook, trust me, you will see tons of opportunities to snag the $10.00 Copius sign up credit from them.
     Grape...Set...Match was released in 2011 as part of the Glam Slam! Collection.  It is a purple metallic duochrome that shifts from purple to blue.  It isn't a very big color shift, in my opinion it is more of a purple metallic with a blue shimmer to it.  Maybe the duochrome effect would be more noticed with three coats instead of two.
     Of course I had to add some stamping to my swatch because plain swatches bore me to death, lol, unless they are the perfect ones that come from Scrangie's blog, of course. 

Base coat: Sally Hansen Hard As Nails Hardener
Base color: Grape...Set...Match by OPI - 2 coats
Stamping color: Stamp Me! White by Essence
Stamping plate: Mash 46
Top coat: Sally Hansen Insta-Dri Anti-Chip Top Coat


Finished product


Taken outside in direct sunlight


Taken outside in indirect light.  The duochrome is most noticible here


Taken inside with out flash


What do you think of Grape...Set...Match?  Do you have it in your collection or did you pass on it last year?


Friday, August 10, 2012

Nicole By Opi Studio Mama Swatches and Sally Hansen Big Money Accent Nail

     As I mentioned in my previous post, I had gone to TJ Maxx and found those Sally Hansen nail wraps.  Well, I also found some Nicole by OPI duo packs and some Essie polishes.  I picked up a duo pack containing Studio Mama and I've Got Bieber Fever.  Both of these colors were relaease as part of the One Less Lonely Girls Collection, which if you haven't figured it out yet, was inspired by Justin Bieber.  The best part of these polishes, it was 7.99 for the both of them.
     I am not hugely drawn to light shades of polish I decided to try wearing it with an accent nail.  Which I am shocked I have never done before.   I wish I could have captured some better pictures but the Gem Crushes don't photograph well.  To much grazy glam!  Bam!  I love it.

Base coat: Sally Hansen Hard As Nails Hardener
Main color: Studio Mama by Nicole by Opi - 3 coats
Accent nail: Big Money by Salley Hansen Gem Crush
Top coat: Sally Hansen Insta-Dri Anti-Chip Top Coat


Outside in direct light


Inside with no flash


Outside in indirect light


I applied the three layers very thin so they dried rather quickly.  I wish this was a little more pink looking but overall like it.  Do you have any of the colors from the One Less Lonely Girl Collection or did you stay away from them?


Wednesday, August 8, 2012

Sally Hansen Salon Effects: Are You Single? Swatch and Review

     A few weeks ago I stumbled into TJ Maxx searching for those $6.99 Deborah Lippmann polishes that everyone was waving in my face.  But of course, because my town is not so in the now with polish, there were none.  I did however find some Sally Hansen Salon Effects real polish stips for the great price of $3.99.  They were Valentine's themed but I knew that a) I was to cheap to pay the normal $8 price tag so why not at least try them, and that b) the next week I would be working like a mad women and this would be the way to ensure something was on my nails at all times.
     According to the Sally Hansen website these last up to 10 days, remove easily with polish remover, and are available in 40 fashion-forward styles.  The one that I picked up clearly is not one that you can still buy, but with 40 other great options, who cares, right?!  Applying these was just a tad tricky to me.  Everyone else says it's so easy to just file off the excess but I just struggled.  I ended up folding the excess over my nail and pretty much pulling it off.  But it worked so who cares, right?  I sadly had tip wear after only 1 day!  :-(  I honestly expected this because I work very roughly with my hands.
     After four days, I was ready to take these off!  For someone who is constantly switching their polish, wearing the same thing for four days is a bit much.  But I must say, I am glad that I had these over naked nails.  The removal also seemed a little more difficult then I expected.  I used acetone and it took a little scrubbing.  I wonder if I should have used regular polish remover?!  Hmmm.  Next time  I will try that.  One other thing I found odd was that mine seemed to have tons of little lines running through out the strips, as you will see in the picture.  This bugged me.  I looked up other ones online though and didn't notice this to be a constant thing, so I am wondering if this has to do with why I found them at TJ Maxx.
     Even with the tip wear, these did last a lot longer than normal polish for me.  I will more than likely try them again if I have another crazy work week or God forbid, a vacation, (I can dream, right?)  But I STILL struggle with the price tag.


Have you tried this or any other nail wrap yet?  Did they meet your expectations?

Sunday, August 5, 2012

Sally Hansen Celeb City Swatches and Stamping With Mash 41

     Hello everyone!  Did you miss me?  I just worked an 80 hour week so I was unable to post to my blog, let alone paint my nails.  I did end up being able to try the Sally Hansen Nail Wraps though.  There will be a post on those later this week.
I have never been more excited to paint my nails!  My addiction has become clearer to me...
     Todays challenge in the Facebook group Adventures In Stamping was to stamp involving silver, gold, and bronze.  Celeb City has been in my stash since before my addiction began.  Meaning, it is a few years old, and it still applies like a dream!  I have always loved this color.  I think I bought it because I saw a soap operah star wearing a silver color and loved it.

Base coat: Sally Hansen Hard As Nails Hardener
Base color: Celeb City By Sally Hansen Hansen Hard As Nails Xtreme Wear
Top coat: Sally Hansen Insta-Dri Anti-Chip Top Coat
Stamping color: Let's Talk by Sinful Colors
Stamping plate: Mash 41


Taken in direct sunlight


Taken in indirect sunlight


Inside without flash